Showing posts with label Mama B Sews. Show all posts

Monday, August 4, 2014

No-Sew Upcycle ~ Leggings to Monkey Bar Shorts

Every summer I face the same ugly reality....monkey bar shorts.  Is it just me or does every retail outlet out there have it all backwards?  No one cares if someone sees their 12 month old daughter's diaper, yet every skirt or dress comes with bloomers.  However, when we begin to worry more about modesty, as they get bigger, the coverings disappear.  I am notoriously on the hunt for those monkey bar shorts and I am not the mom who is willing to pay high dollar so they will look cute when my kid hangs upside down on the playground.  Well, this year I figured it out and I want to share it with you!


By show of hands please...  How many of you have leggings in the drawers that look like this?  I am so ashamed to think about how many pair I have thrown away.  Not.any.more.  This is going to blow your mind....not your wallet!

Here's what you do.

1.) Purchase this wonderful stuff pictured below called Stitch Witchery.  I found mine at Hobby Lobby but you can typically find it at any sewing goods store.


2.) Put the leggings on your child then measure and mark how long you want the shorts to be.  After marking the pants and removing them from the child, add about 1" for the turn under, as long as your Stitch Witchery is about 5/8" wide.

3.)  I fold the legs one on top of the other and cut straight across.

4.) Next, you will turn the cut edge toward the inside of the legging an inch all the way around.  Press with an iron as you go.  Don't skip that step!  Yes, I am aware that iron is a four letter word to some of you.  ;)

5.)  Now, simply cut a piece of stitch witchery the length to cover the front and another piece for the back or you can choose to work with one long piece.  It was easier for me to use two pieces, since this pair was somewhat small in the leg.

6.) After you get it in place, place your hot iron on top of the section.  The directions will tell you not to slide the iron.  They also tell you to place a damp cloth between the iron and the fabric you are working on.  I did not do that and mine turned out fine.  Here is what it will look like.


Now, you can just stop here and all is good in the world.  Some reviewers of this product say that re-application may be necessary after several wearings.  Others say it lasted much longer.  It will obviously depend on the wear and wash factor. 

IF you have a sewing machine, like I do, you may choose to reinforce this.  If you wish to do so, simply run a zig-zag stitch with a pretty good length on it, for stretchability, all the way around.  If you run a straight stitch they won't be comfortable around her leg and will have zero stretch.  Also, don't forget to change your needle to ball point since you are working with cotton.  Since my middle princess is very girly I decided to go the extra mile for her and put a "frill" on hers.


Sew there you have it!  A simple and (almost) FREE solution since we all have some worn out, too short, and faded leggings hiding in those drawers! 

Happy Monday! ~ The Sewing Mama

Sunday, June 1, 2014

Upcycle - Gap Dress via Goodwill

So we did another upcycle.  This one was for Olivia.  Let me explain how this came about.  A year ago, when I was on the chair mission that involved every Goodwill and Thrift Shop within a 50 mile radius, I could hardly avoid having a child along every once in awhile.  Insert Olivia.  Olivia hates to shop.  With a passion.  I have been given a glimmer of hope this year, but for the sake of the story we will stick with her overall attitude towards my hobby.  So, one day I am making a a swing through the Goodwill furniture section and I realize she is not standing right under my feet.  Just a few moments of panic later and I found her digging in the kid's clothes.  She was having fun.  Correct me if I am wrong, but people who generally don't care for shopping should not enjoy the "hunt" of a Goodwill.  Oh, but she was.  She came out with this little blue dress from the Gap.  Once in the fitting room, I tried my best to send it back but she was not having it.  It needed work.  Too much work.  Five minutes later we owned it.  A year later I have pulled it from the stack hoping it might fit better.  It did not.  So here ya go.


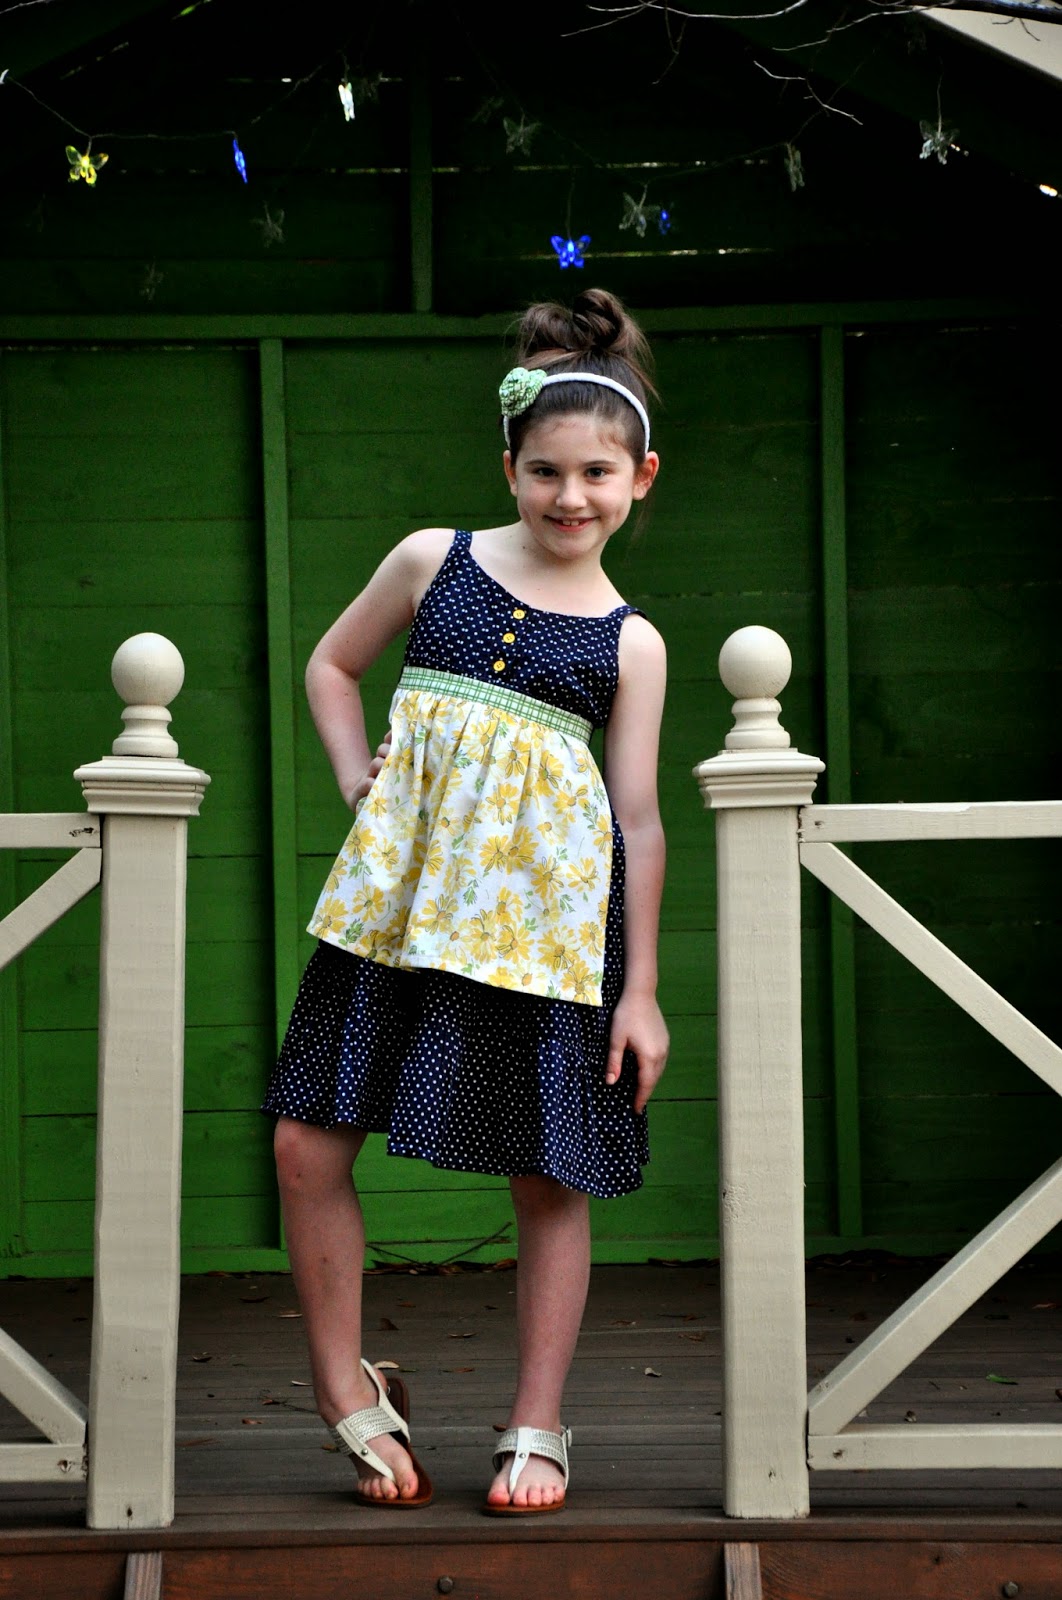
There were two main issues that we had to address.  One was the fact that the dress was cut too low in the front.  That was the part I had hoped would fix itself with a year's worth of growth.  Second was the fact that there were two sewn in belt loops and no belt.  I pulled out all of the fabrics I had (another free upcycle plus the cost of the $2 dress).  I gave her several ideas to choose from, but she knew exactly what she wanted.  It was not my first choice but I was reminded that my job was to sew.  In the nicest, most polite way of course.  She wanted an apron dress.  In the truest, most raw form.  

 
The apron dresses that I am used to seeing have the "apron" sewn into the dress, not as a detachable piece.  She declared that idea was not an apron dress since she wouldn't be able to remove it.  So, I made a gathered apron with the fabrics she chose.  Fully detachable, of course.


Once the apron was constructed and put on I felt like something was still missing.  So, I went on the world's longest search for yellow buttons.  Apparently yellow is the color for summer.  It is not my color so I was quite shocked that it took more than one store to find such a simple item.  But, I was glad I kept on it because they are my favorite part.


To address the low cut front I carefully cut the straps in the back at the place they joined the dress.  I made a button hole on the back of the dress and attached a button on the strap.  I did not cut the strap down to size and here is why.  As she grows we will be able to place another button on the strap to allow for growth if needed.  Or, just move the button.  Since I have two other girls, we would opt for adding buttons.  


The last touch was the handmade headband.  I have quite a few plastic headbands that have unraveled over the years.  I finally decided to re-wrap one and use for this project.  This is not an easy task.  I then made two fabric rosettes and layered them using hot glue.


 Another happy customer.  I am two for two in the upcycle department....simply because my most demanding customer is still waiting in the wings.  ;)  

--------The Mama

Wednesday, May 21, 2014

Upcycle and There's A First Time for Everything


So I posted this photo to Instagram the other day... 


and declared an #upcycle was about to happen.

 If you are not familiar with that term let me explain.  For a seamstress, an upcycle is when we take a used piece of clothing or other fabric item and turn it into something new.  I have an entire bin of these items.  Why?  Because I have three children who constantly test my stain removing skills and while I do have "skillz" in this area some nuts you just can't crack.  Can I get an Amen?  I really do enjoy this challenge and the opportunity for my mind to think outside of the pattern world it so prefers.

This upcycle began with a stained cream t-shirt that Addison wore when she was Allye's current age (2.5).  I knew that I wanted this to be a no cost upcycle, which meant I could only use what I had in my stash.  After planning it all out and photographing the materials, I changed my mind because my brain started doing somersaults when the words July 4th popped in.  Let me give you the image.


These were the outfits I made last year for July 4th.  The dresses on the older girls still fit.  However, Allye's is no where close and has actually been handed off to a friend so that I will see it again.  :)  My mind started racing and began the search for every piece of any of these fabrics I could find.  When I realized I could make this work I was beyond thrilled.  If you don't sew you might not understand just how wonderful this feels.  


Here's how it went down.  I decided on the final length the dress was going to be and made all of my cuts accordingly.  I completed the bottom of the dress entirely before ever cutting off the shirt, just in case I miscalculated somewhere.  It happens people.  I really put a lot of effort into this and was so thrilled when I got it all put together. 
  I thought from the beginning that I would monogram the final dress, but was unsure when it was done so I slept on it.  I have really cut back on the monograms for the older girls because of the need and desire to pass on the items being worn.  Ultimately I decided to go for it.  Allye was so excited her "name" was going to be on the dress.  She asked to help and I agreed.  After getting it set up and ready I allowed her to sit on my lap and press the button, her favorite job.  I was smitten from the second it came off the machine.  I hung it from the china cabinet just so I could marvel at it.  Then yesterday, on her way to the park, Olivia stops by the dress and says, "Mom, who did you make this for?"  Momentarily I wondered if she had lost her mind.  "Um, Allye," I responded.  "Why?"  "Well Mom, you put Addison's initials on it."  I died right there.  

First of all, if you monogram, this is your worst nightmare.  Second of all, it is worse than a nightmare to do it to one of your own children.  I really can't describe my feelings in that moment.  I let it sit there overnight.  This morning I put my big girl panties on and figured it out while I played at the beach with the girls.
  I saw this idea in my new sewing book, Sew Classic Clothes for Girls, and had been wanting to try it, not particularly for this reason but I knew it was the perfect opportunity.  It is a removable monogram so multiple siblings can wear the same item over the years.  You simply monogram the piece of fabric and attach using buttonholes.  When the next sibling wears it you place their monogram on it.  Genius right? 


So there it is.  A great way to turn something headed to the trash into a keepsake.  And in this case, a first time mistake that will be a forever memory.  I hope you are inspired to look at something old and trash worthy in a new way.  I would love to see it!

---- The Mama


Related Posts Plugin for WordPress, Blogger...